surfresearch.com.au
 |
surfresearch.com.au
catalogue
specifications
|
INTRODUCTION
This page has ben
prepared in reponse to several correspondents offering to submit
board details and or images.
While my
requiements may seem extreme, the objective is to present
maximum material in a regular format.
If this seems
like a lot of work, it is.
My work load will
be substantially reduced if emailed submissions conform to my
requirements.
Suggestions for
intending contributors...
1. email
surfresearch.com.au and request provisional catalogue entry
number
2. Use this
number as the filename for your catalogue entry and with an
extension for the associated images,
see Scans.
3. Download this
page to your hard drive, check you have the images.
4. Print this ( 6
) pages, use black and white/economy, images may not appear.
5. Use print out
for reference and the back for your notations and calculations.
6.
Install/download Netscape Communicator, readily available. I use
4.7
7. Select a
catologue entry that approximates your board by design or
manufacturer, and download.
8. In Netscape
Communicator, select : File. Select : Edit Page. Opens Netscape
Composer.
9. In Netscape
Composer, highlight and update data from your notes, insert
images and and save changes.
10. Submit saved
updated page to surfresearch.com.au
2. Use this
number as the filename for your catalogue entry and with an
extension for the associated images, see Scans.
BOARD PREPARATION.
1. Carefully
inspect board for areas of damage.
2. Clean wax from
deck, and any deposits on the bottom, with a wax comb.
3. Clean board
with rags and ... acetone/alchol/spirit/WD 40/warm water and
detergent, other.
4. Rinse with
clean water and dry wih rags.
PHOTOGRAPHS
1. Use a SLR or
digital camera - a pocket camera will be able not to shoot
decals or fins.
2. Do not use a
flash - it will just put a glow spot on the board.
3. Try to pick a
spot outdoors but not in direct sunlight.
4. Ideally
background should be plain/uncluttered and in contrast to the
board colour.
5. Personally, I
set the camera on auto exposure (appeture and shutter speed), no
flash, manual focus.
And try to hold
it as steady as possible.
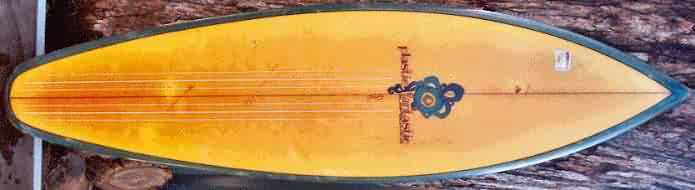
Template
photographs - deck and bottom
1. Stand
the board securely upright, if possible put a block
under the tail.
2. Use a
tripod (I don't) and use a detail, for example the
decal, to sharpen focus.
3. Aim
the camera at the centre of the board to minimize
template distortion.
4. Try to
fill frame, nose to tail, but without cutting off
either.
5. Shoot
both deck and bottom. |
 |
Decal/Markings Photographs
1. Use a tripod
(I don't), the camera aimed at the centre of the image to
minimize distortion.
2. Shoot as
close as possible, with the sharpest focus. It is usually
difficult to fill the frame.
3. Shoot all
relevant decals.
Fin
Photographs
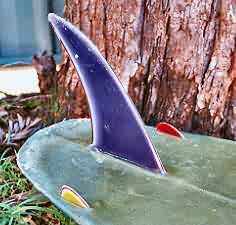
1. Best shot
is at about 33 degrees, showing the tail.
2. Alternative
is the more accurate profile shot, but this is less
informative, particually for multi fins.
SCANS
Note this is a
new scaling format as of June 2002, see entry #100.
All scans at a
resolution of 72 pixels per inch
All dimensions
metric/centimetres
General Method
- pre-scan and
set resolution at 72 dpi
- select
oversized image, complete scan.
- digitally
manipulate image, eg Rotate, Clarify, Enhancement, Sharpness.
- finely crop
image
- save as JEPG
file
- convert to 256
colours and /or process via a jepg compressor eg xat.com
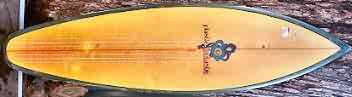
1. Deck Large (or
bottom if more interesting)
- select
oversized image, specify board length as 26 cm, complete scan.
- finely crop
image, specify board length as 25 cm., 20cm for small boards.
- save as JEPG
file, with a file name like 380x.jpg
2.
Deck
to Scale and 3.Bottom to Scale
- calculate
length to scale at a ratio of 1 foot = 2 cm. For example
six foot 0 inches = 12cm. See Scaling
Table.
- select
oversized image, specify board length as over-estimated scaled
length in cm, complete scan.
- finely crop
image, specify board length to scale in cm.
- save as JEPG
file, with file names like 380.jpg for the deck and 380b.jpg for
the bottom.
4. Fins
- select
oversized image, specify image width as 8 or 10 cm, complete
scan.
- finely crop
image, specify image width as 8 cm.
- save as JEPG
file, with a file name like 380f.jpg
5. Decals
- select
oversized image, specify image width as 8 or 10 cm, complete
scan.
- finely crop
image, specify image width as 8 cm.
- save as JEPG
file, with a file name like 380d.jpg For more than one
decal, file as 380d2.jpg etc.
6. Markings
- select
oversized image, specify image width as 8 or 10 cm, complete
scan.
- finely crop
image, specify image width as 8 cm.
- save as JEPG
file, with a file name like 380m.jpg
7. Portraits
- select
oversized image, specify image width as 10 cm, complete scan.
- finely crop
image, specify image width as 8 or 10 cm.
- save as JEPG
file, with a file name like 380p.jpg
8.
References/Other
- select
oversized image, specify image width as 12 cm, complete scan.
- finely crop
image, specify image width as 10 cm.
- save as JEPG
file, with a file name like 380r.jpg For more than one
reference, file as 380r2.jpg etc
MANUFACTURE
Note : Any of the
manufacturing details on the board could be misleading.
MANUFACTURER
-
usually indicated by the decal
SHAPER -
sometimes indicated by decal or markings on the blank, but
these can be the most misleading.
DESIGN - the
approximated general design, for example Twin Fin II, or in rare
examples, a model name.
DESIGNER - the
shaper/surfer most associated with the design, for example Mark
Richards.
SPECIFICATIONS
CONSTRUCTION.
Assuming the
board is foam/fiberglass...
1. Check for
indication of the blank manufacturer
2. Note number,
width and possible composition of stringers.
3. Fibreglassing
- note rail cuts, tinting, pigments, spray, resin pinlines,
finbox/plugs, leg rope plugs.
4. Finish -
gloss/matt
Examine the
board to distinguish the original features from...
discolouration -
bleaching and/or staining
stress marks -
usually acrcoss the bottom/centre of the board.
delamination -
decals and foot/knee wells.
swelling -
stringer/repairs
shrinkage -
stringer/blank/repairs
warping - twist
in the blank
repairs - often
cover features
post production
leg rope plugs - note side
non original fin
- blank damage from loss of original fin.
DIMENSIONS
Using a flexible
steel tape measure with imperial dimensions (that is feet
and inches)...
Measure
dimensions on the bottom where possible

Length (Bottom)
Measure along the
bottom of the board, nose to tail.
- bend tape
around central fin, remove if possible
- add to include
missing nose or tail tips
- split tails (eg
swallow tail) are estimated at their extremity.
Length (Deck)
Measure along the
deck of the board, nose to tail.
- strecth tape to
measure as a straight edge.
- add to include
missing nose or tail tips
- split tails (eg
swallow tail) are estimated at their extremity.
NOTE
A surfboard has
two lenghts.
Most measurements
appear to refer to the bottom, possibly because it is usually
shaped first.
Technically the
straight edge deck length is probably the most consistant
indicator.
Variation in
length measurement is indicated in the rocker/thickness image
below.
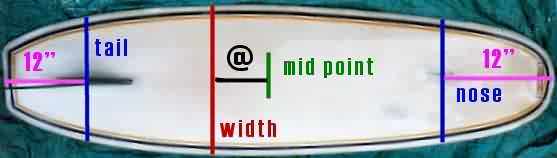
Mid point
Divide the bottom
length by 2, measure from the nose.
Mark on the
bottom stringer with a marker pen or a bit of adhesive tape.
Width
Measure the
widest part of the board.
Mark on the
bottom centre line with a marker pen or a bit of adhesive tape.
- adjust the tape
over about a 6 inch range to confirm the widest point.
Wide Point
Measure the
difference between the Mid-point and the Width markings on the
centre line.
- if the widest
point is at the Mid point, then the Wide point is 0 inches.
- if the if the
widest point is forward of the Mid point (towards the nose),
then the Wide point is positve
eg +ve 6
inches.
- if the if the
widest point is behind the Mid point (towards the tail) ,
then the Wide point is negative inches.
eg - 6 inches.
This is the case in the example above.
Nose
Measure 12 inches
from the nose of the board.
Mark on the
bottom centre line with a marker pen or a bit of adhesive tape.
Measure the width
at this point.
Tail
Measure 12 inches
from the tail of the board.
Mark on the
bottom centre line with a marker pen or a bit of adhesive tape.
Measure the width
at this point.
- often the fin/s
make this difficult and this meaurement is easier to do on the
deck.
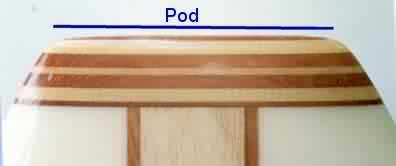
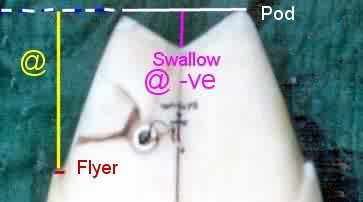
Pod
Measure the
widest section of the tail
- for a pintail
the pod is 0 inches
- for split or
diamond tails measure beween the two extremities and positive or
negative depth of variation.
- for square
tails measure beween the two extremities
- for rounded
tails the measure may not seem valid, consider as a pintail
Flyers
Measure from
tail, see Pod image above.

Thickness
Measure the
thickest section of the board
- difficult to
measure by eye with the tape against the rail, usually you
underestimate.
- ideally measure
with calipers.
- or use 2
straight edges across the board (deck and bottom) and measure
the gap.
Nose and
Tail Lift
Place board on
straight edge down centre line and measure the gap at nose and
tail
- a highly
inaccurate method,
- usually made
more difficult by the fins
Dimensions
Table
The above
dimensions are inserted in the following table
|
Length :
|
|
ft |
|
inches |
L2: |
|
|
Width :
|
|
inches |
|
Wide Point :
|
|
inches |
|
Nose :
|
|
inches |
|
Tail :
|
|
inches |
|
Thickness :
|
|
inches |
|
Pod :
|
|
inches |
|
Nose Lift :
|
|
inches |
|
Tail Lift :
|
|
inches |
|
Weight :
|
|
kilos |
|
Volume :
|
|
litres |
|
Other :
|
|
inches |
|
|
|
|
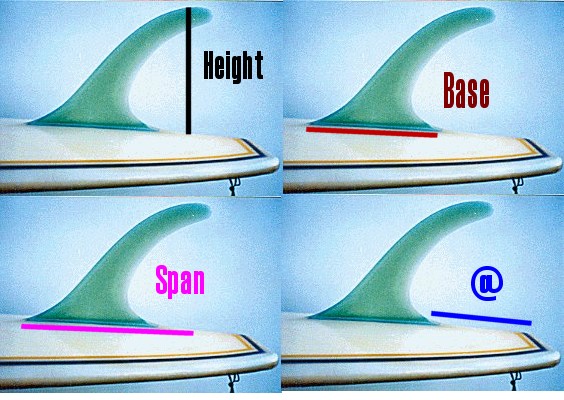
FIN/S
Indicate number
of and, if possible, the design of the fin/s - consult the Fin Catalogue
Measure height
from board to top extremity of the fin.
Measure base of
fin.
Measure distance
from front of base to a point on the bottom that aligns with the
fin tip. the Span.
Measure distance
from the base to the tail of the board ( @ )
DECOR
DECALS
Examine and note
decals.
These may
indicate Place of manufacture, Shaper, Glasser.
Most
manufacturers redesign their labels, sometimes with only minor
variations. These can be useful to date the board.
A decal reading Designed
by John Smith usually indicates that the board was not
shaped by John Smith.
Some decals can
be trimmed by the glasser resulting in an unusual re-design.
Decals are often
subject to delamination off the blank.
MARKINGS
Carefully examine
the board and note any markings on the blank, usually down the
stringer in pencil.
Some later boards
may be annotated on the glass with a marker pen.
These markings
are often inconsequential, but occassionally give the date of
construction.
If the markings
indicate dimensions, it is possible that these are incorrect.
COLOUR
Examine and note
decor (that is any decoration added to the board). Look for...
Tinted/Pigmented
resin
Spray on to
blank/on to glass
Resin/Spray
pinlines
Hand
painted/sprayed text/graphic.
Wax alternatives,
eg adhesive grip pads.
Nose guards
Refer to Standard Decor Designs
BOARD HISTORY
Details of board
purchase, riders, repairs. These may be cleaned from
documentation, oral report or estimation.
Usually trival,
this information can be useful
MANUFACTURER HISTORY
DESIGN HISTORY
The board in
context of general design history.
REFERENCES
Documentation
Magazines
Books
Film/Video
Other
CONDITION
An subjective
sliding scale to cross reference with the image quality.
SCALING TABLE
| 1 ft |
2 ft |
3 ft |
4 ft |
5 ft |
6 ft |
7 ft |
8 ft |
9 ft |
10 ft |
11 ft |
12 ft |
| 2 cm |
4 cm |
6 cm |
8 cm |
10 cm |
12 cm |
14 cm |
16 cm |
18 cm |
20 cm |
22 cm |
25 cm |
|
|
|
|
|
|
|
|
|
|
|
|
| 1'' |
2'' |
3'' |
4'' |
5'' |
6'' |
7'' |
8'' |
9'' |
10'' |
11'' |
12'' |
| 0.17cm |
0.34 cm |
0.5cm |
0.67 cm |
0.84cm |
1 cm |
1.17cm |
1.34 cm |
1.5cm |
1.67 cm |
1.84cm |
2 cm |
catalogue
menu
Geoff Cater (1999-2014) : Appendix
: Catalogue
Specifications.
http://www.surfresearch.com.au/00000000s.html