Vela Aqua : 10ft
Surboard Plans , 1959
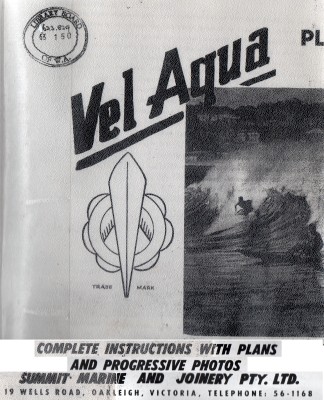
Vel
Aqua : Do it yourself Plywood Surf Board Plan
10 ft. Surf Board - Complete instructions with plans and
progressive photos.
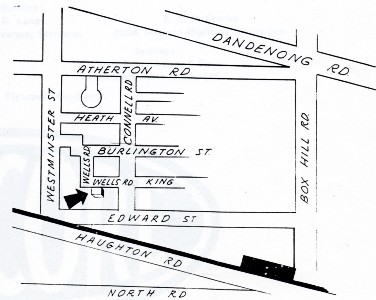
Summit Marine and Joinery Pty. Ltd.
Oakleigh, Victoria, [1959]
Introduction
An assembly manual for a
home-built surfboard by Summit Marine and Joinery Pty. Ltd. of Oakleigh,
Victoria, ideally with timber supplied
by the company.
Thee models are available - paddle-board, 10 ft surfboard,
and 10 or 12 ft surf-ski.
Interestingly. the surfboard is sub-titled the Okanue,
a name associated with a similar hollow timber board first
produced by Gordon Woods, Barry Bennett, and Bill Wallace in
Sydney following the tour of US and Hawaiian
surfers/lifeguards in 1956.
These Malibu-replicas had shaped rails in solid timber and a
large fin, unlike the shallow keel and square rails of the
Vela Aqua design
The publication also includes two pages of surf riding
instruction, which appears to be written for the surf-ski
rider and is occasionally
misleading,
The paddle-board, propelled with a double-bladed paddle, was
extremely popular in Victoria in the 1960s, and, although
generally not used in the surf, they were used on a wide
variety of water courses from large bays to rural dams.
The original format has been adjusted and some of the
dimensions have been adjusted for clarity, for example 1/2'' =
0.5''.
This transcription from the only known copy, held by the State
Library of Western Australia.
[Page 1]
HOW
TO ASSEMBLE YOUR SURF
BOARD.
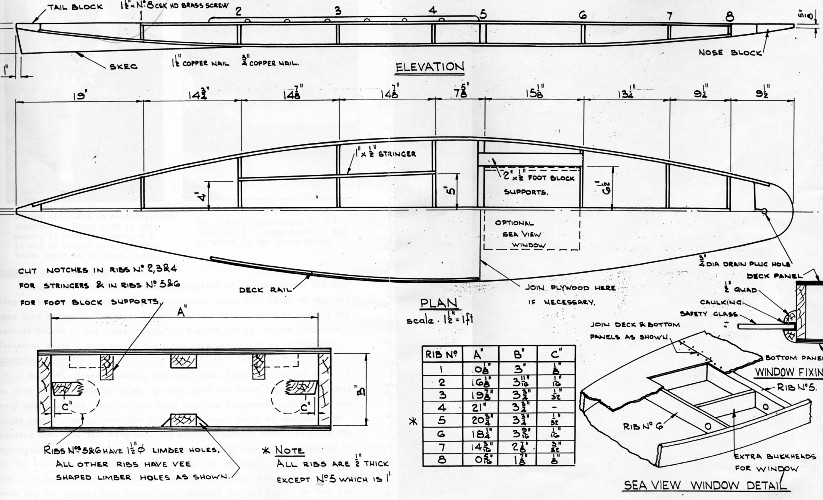
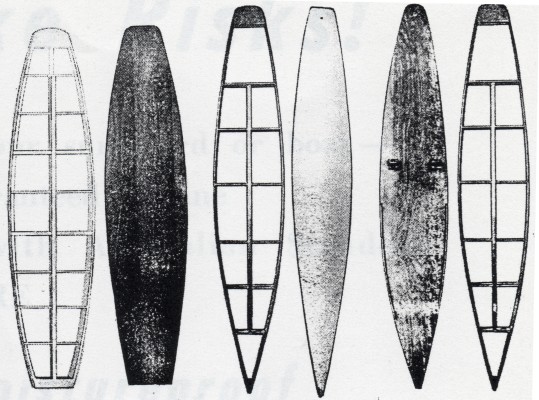
The plans supplied give details of sizes of the Surf Board.
It is of course necessary to obtain the materials dressed to
size from your Timber Supplier or alternately dress the timber
yourself to sizes specified in timber list.
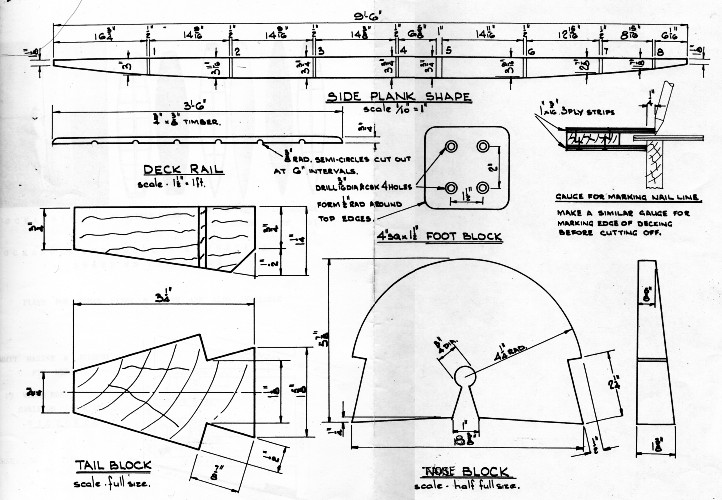
The next step is to taper the sides of the dimensions shown in
the drawing.
A sabre saw is a handy tool to have if you contemplate much
boatbuilding.
After you have shaped the sides, the next step is to shape nose
and tail block as in diagram.
Cut the bulkheads to length and bevel the edges; then bore the
holes in the 1" thick bulkhead to allow free circulation, cut
the timber holes in all the thick bulkheads and cut out the
checks for the various king planks and stringers.
Clear enough space on a flat bench or table and lay out your
board components.
The board is assembled in the first stages upside down (ie: top
of the board on bench top bottom of board up).
Mark cut the positions of the bulkheads on the insides making
sure to double check your measurements at this stage.
A little extra time spent here could save a lot of time later
on.
Instructions for use of
UREA FORMALDEHYDE GLUE
using liquid "Grasp" Urea
Glue with HARDENER
Type - G.F. 62 Gap Filling Hardener
MIXING PROPORTION
10 parts Glue to 1 part Hardener, by
weight
6 parts Glue to 1 part Hardener, by measure
POT LIFE OF MIXTURE
80 degs. F - approx 45 minutes
70 degs. F - approx 1.5 hours
60 degs. F - approx 2.75 hours
ASSEMBLY TIME (CLOSED)
Using freshly mixed Glue:
80 degs. F - approx 25
minutes 70 degs. F - approx 35
minutes 60 degs. F - approx 45
minutes
PRESSING TIME
80 degs. F - approx 2.5
hours 70 degs. F - approx 5
hours 60 degs. F - approx 8
hours
Pressing time stated for flat work.
For stressed or bowed work, times should be at least doubled.
Up to 5% of water may be added if glue is too thick to spread. NOTE:- Glued assemblies are to stand for 24
hours to develop further strength before machining.
[Page 2]
10ft TIMBER LIST
1 - 6ft x
4ft x 3/16'' Sheet Marine Ply (Vencore Marine Ply is
recommended) 1 - 4ft x 4ft x 3/16''
Sheet Marine Ply (Vencore Marine Ply is recommended)
Timber Meranti or Oregon (Clear)
3.75'' x 0.5''Sides &
Bulkheads. 1'' x 0.5''
2/l0 Sides & 9ft for Bulkheads
1" x 0.5" Stringers & King
Planks l/9ft l/8ft 2/2ft 6" 2'' x
0.5" Foot Block Supports 2/1ft 6" 6" x 1.5''
Nose and Tail Block
1 Pint Urea Glue and Hardener. Approx 630
- 0.75" x 16 SWG Monel 8 ozs or Copper 12 ozs. Approx 33 - 1.5" x
12 SWG Monel 2 ozs or Copper 2 ozs. 1 Drain Plug. 3 - 0.75" x 4" Raised Head Brass Screws.
MIXING OF GLUE AND
HARDENER BEFORE APPLICATION:-
Weigh out quantity of glue for job, keeping in
mind the max. life of mixture as shown.
Average gtiie spread is 20 sq. ft. per pound.
Mix the hardener thoroughly.
It is necessary to spread only one surface of joint to be made.
Time allowed from start 6& spreading till application of
pressure will vary with atmospheric conditions and timber used.
At all times the glue must still be soft when pressure is
applied so that excess glue will squeeze out.
IMPORTANT:- It is
essential that the glue line be thin.
This will eliminate crazing and weak joints.
Glue and nail ribs nos. 3 & 5 as shown in photo
No.1.
Check this section for squareness and nail the king
plank as a temporary diagonal brace. Glue and nail the nose and
tailblocks in position as shown in photos No. 2 & 3
using string or rope as as means of holding sides
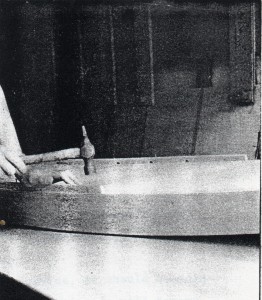
together if no clamps are available. Glue
and nail bottom king plank in position as shown in
photo No. 4.
Now turn the framework
over and nail king plank, 1'' x 0.5'' stringers and
foot block supports.
Plane all sides, ribs, nose and tail blocks level.
[Page 3]
Photo No. 2
Photo No. 3
Now cut your plywood sheets out about 0.25''
to 0.5" bigger than your board, then make up a little marking
jig as shown in diagram.
Spread glue on bottom framework of surf board.
Photo No. 4
Photo No. 5
[Page 4]
Lay ply on bottom and
nail approx 2-3 nails at each end.
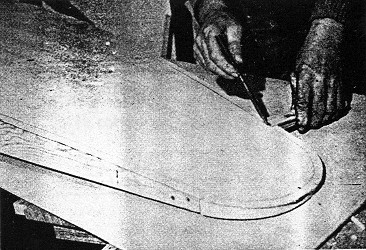
Take marking jig and make pencil line all round board
as shown photo No. 6.
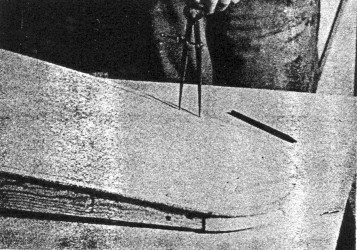
Take a pair of dividers or compasses set points 1.5''
apart, mark nail position shown in Photo No. 7.
Bulk-head and King Plank nails are spaced at 3"
centres.
Now nail bottom ply on to the framework, working as
quickly as possible if the weather is hot.
The glue could be cured before you have finished the nailing giving you weak
spots in parts of your board which will inevitably
leak.
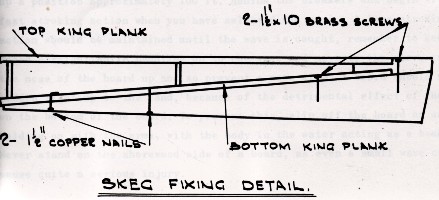
The next step is to fix the fin on the bottom with
glue, screws and nails
as in Photo No. 8.
The position of the nails etc. indicated on the plan.
The ply is fixed in position on the top of the board
using the same procedure as with bottom ply.
When glue has dried bore the hole for the drain plug.
Plane the plywood flush with the sides of the surf
board
It would improve the surfboard if edge of the plywood
was rounded.
If left square it
could be dented and the paint will rub off easily.
Rounding edge helps to prevent this.
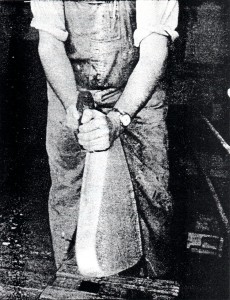
Previous photo shows
ply being planed off,
this is not always convenient.
Plane held in this manner is sometimes
awkward & it may be easier to stand astride
board as in Photo above.
It is also advantagous to fit side rails to your
board or Ski as shown in the above Photo.
PAINTING YOUR SURFBOARD.
When you have completed the construction of your surfboard the
next step is to paint it.
Most brands of exterior paint will stand up very well when used
as marine finishes.
If you desire a clear finish to enhance the natural beauty of
the timber grain, we suggest any of the new synthetic finishes,
using a catalyst to start the chemical action is recommended. EXTERIOR PAINT.
Sand your board carefully and apply your first coat of red lead
or pink primer.
When the primer is dry, sand the board lightly, and apply your
undercoat and leave to dry.
Sand down the undercoat lightly, and now apply your finishing
coat.
The life of the board could be lengthened by sanding doVn your
finishing coat and applying another coat.
It helps the appearance of the board if stripes or a design of
some sort is painted on to the board.
We suggest stripes as being the simpliest method of decorating
your board.
This is done with masking tape.
Make sure the top coat has been dry for several days before
applying your masking tape, as when you remove the tape, you may
also remove the paint.
[Page 6]
CLEAR SYNTHETIC FINISH.
If you decide on a clear finish there are many reliable brands
on the market, and these would be applied in accordance with the
manufacturers instructions.
It is however important to note that no undercoats are used, 3
or 4 coats of the synthetic instead.
It is important to dilute the first coat by 10% of the special
thinner used, in order to give a good key in the timber, and
obtain a longer life before repainting.
You will also need some of this thinner to clean the brushes.
CARE OF YOUR SURF BOARD.
It is sometimes advantageous to fit toe straps and blocks to
your board for easier riding.
If it is possible to do so we always advise that this is done.
A Board well looked after will give long service.
It should be varnished to keep it free of leaks, as a board with
water inside will become heavy and you will not have the good
equipment for riding.
The board can be washed clean after use and kept in a special
place to dry out.
Do not at any time leave the plug in the board as damage could
be caused in warm weather, if the seams should split.
CONCLUSION:
If care has been taken
through the laying of ply, a waterproof finish which will
withstand severe punishment for many years will be obtained.
[Page 7]
LEARNING TO PADDLE.
Learning to paddle the board is best done in calm water for a
start, take the paddle in both hands, roughly the width of the
shoulders apart, now with the arms partly bent, proceed to put
the blade of the paddle in the water.
The blade is then pulled through the water keeping it just clear
of the board.
The same action is repeated on the other side of the board.
When you feel confident having learned to paddle easily, you are
then safe to try the surf.
PUTTING THE BOARD INTO THE SURF.
To get the board into the surf, lie your paddle onto it, having
put your board into the water, push it along standing to one
side, do not at iny time push from behind as the board could hit
the body and cause an accident.
When the water is knee deep you can sit on the board and start
to paddle, depending on how heavy the surf is you may need to
push your board further out, then mount.
The tail should be kept down and so lift the nose over the
broken waves, in doing this lean backwards on the board on going
Into the surf, and when you have got over the wave lean forward
again and keep paddling all the time.
When a steep wave has been cleared, you need to watch you are
not thrown off your board, as even though you may clear the wave
the nose can bump down into the trough and bounce you off.
To avoid this, lean forward on the nose to balance yourself as
you go into the trough.
After this paddle again ready to catch a further wave.
SHOOTING THE BRAKE.
To catch a wave the board must travel at almost the same speed.
Take up a position approximately 100 ft. behind the breakers and
begin with a fast stroking action when you have selected the
wave.
A long stroking action should be maintained until the wave is
caught, remember to keep the board straight while paddling on to
the wave and move to the stern to bring the nose of the board up
and so prevent a nose dive.
A board should not be ridden right up to the sand, because of
the detrimental effect of the sand on the bottom of the board.
To prevent this, slip off the board on one side holding on with
the arms, with the body in the water acting as a brake.
Never stand on the shorewood side of a board, as even a small
wave could cause quite a serious injury.
[Page 8]
After the art of riding a wave sitting has
been mastered, the stand up position can be attempted.
As soon as the wave has been caught grip the gunwhale with your
hands and push yourself into a standing position.
Balance yourself and move up and down the board as is necessary
to keep board on an even trim.
FANCY BOARD RIDING
When you become adapt at riding the waves in a standing position
this fancy riding can be tried.
RIDING IN BACKWARDS
Sit on the board with the stern facing the shore, then you catch
wave and ride in as you would in a normal position. As soon as you have reached the
standing position you can try turnaround with 2 steps.
WALKING
THE BOARD.
Walking the board consists of moving backwards or forwards by
placing one foot behind or in front of the other, and taking 3
or 4 steps towards the nose or tail.
HEAD STAND.
Should you feel proficient in the art of riding your board,
there are many other forms of fancy riding that can be
attempted.
The Head Stand is often seen, and is performed only when a wave
is unbroken.
The wave is caught when you are in a sitting position, put your
paddle down and grip the gunwhale with both hands, pushing
yourself backwards on the board about 2 or 3 ft. behind your
usual sitting position; now lean forward and grip the gunwhale.
Slip your legs back into a kneeling position, place your
forehead about 1 ft. in front of your arms, forming
a triangle with your head and hands, and from there, raise
the hips and legs, finally straightening the legs.
A proficient person may make a stand with perfect-arched back
and toes pointed.
Many hours of enjoyment can be hed in the surf when you have
gained full confidence to perform these various forms of
relaxation.
Vel Aqua : Do it yourself Plywood
Surf Board Plan
10 ft. Surf Board - Complete instructions with
plans and progressive photos.
Summit Marine and Joinery Pty. Ltd.

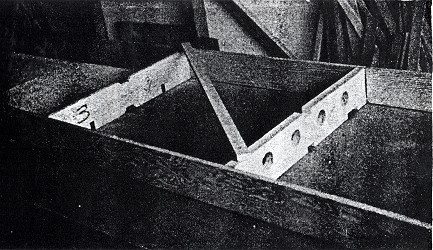
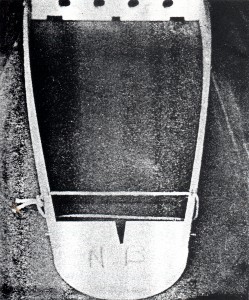
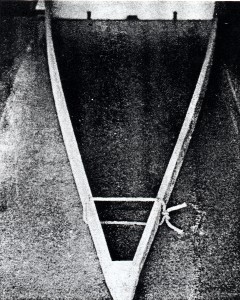
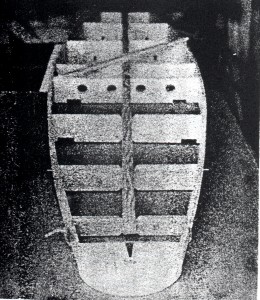
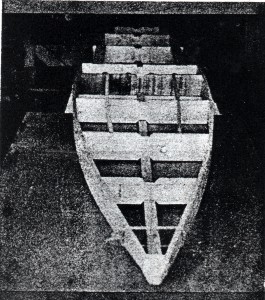
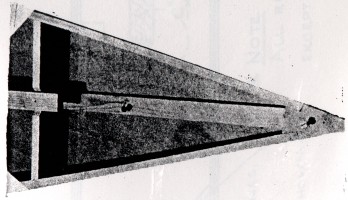 Photo No. 8