 |
surfresearch.com.au
renwick : foam plastic board, 1958 |
| home | catalogue | history | references | appendix |
|
A photocopy of this
article was contributed by Mick Kershler, Anna Bay, October 2008, with
many thanks.
In 1953, Bill Reid
suggested a method whereby the blank was first covered with muslin cloth
between two coats of a plastic sealer before fibreglassing with standard
resin.
See:
1953 Bill Reid
: Fun on a Plastic
[Styrofoam] Surfboard.
Popular Mechanics
Magazine July 1953 Volume 100 Number 1 pages 157-159.
This method was employed by some New Zealand surfboard builders in the 1950s-early 1960s, as balsawood and polystrene blanks were difficult to obtain due to import restrictions.
Stryofoam, or Coolite,
in combination with expoxy resin was used for a short time in Australia
by McDonagh Surfboards in the late 1950s.
The styrofoam-epoxy
combination may have also been used by some American manufacturers.
The method became
an accepted manufacturing method beginning around the mid-1990s, following
years of intensive and expensive development by sailboard manufacturers,
now comonly called epoxy boards
HOW TO BUILD A
foam
plastic SURFOARD
 |
Here's a plan
you've all been waiting for.
Building this surfboard is so simple that Grandma could do it. Cost won't be a problem either! |
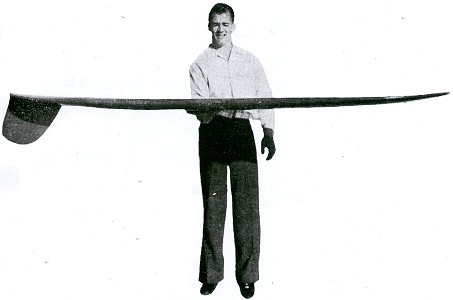
Eight feet is
the recommended length for the board, but if you weigh over 13 stone it
would be wiser to make it nine.
Cut one ft. each
off two of the Coolite blocks and glue them together with Epoxy Resin so
that the glued together Coolite measures eight ft. by two ft.
Stagger the small
blocks of Coolite so that no single join extends right across the board.
Once the board
is glued together .the top shape can be cut out.
The width of the
board should be about 22 in.
The Coolite should
be shaved away at the nose, from the underneath, and starting from about
three ft. back.
The edges of
the board at the nose should be very narrow, towards the centre they should
be rounded and at the tail quite narrow, though not as narrow as at the
nose.
Like the nose
of the board, the tail should cut away from underneath until right at the
tail it is about 1 1/4 in. thick or less.
Coolite can be
shaped with a carving knife, or a bread knife.
It is extremely
easy to cut.
Cut out the top
shape and round the side roughly with a knife, finishing off with fairly
fine sandpaper. It is important that the finish should be smooth, and extra
work on the shaping will pay dividends in a much better final finish.
Once the shape is finished, the whole board should be covered with two coats of epoxy resin, which seals it from the chemical action of the normal fibreglass resin.
Now comes the
time for laying the fibreglass.
This can be bought
in lengths 54 in. wide.
It is laid in
the board and cut so that it completely covers one side with a few inches
hanging over to wrap around to the other side.
The resin is
applied with a brush, working from the centre of the board out to the edges,
and towards the ends.
Enough resin
is applied to completely impregnate the cloth.
Rather than put
all the little tips about fibreglass down here (they would be much too
confusing) have a talk with the fibreglas (sic) dealer from whom you buy
your materials.
Once you have
completely fibreglassed one side, apply resin to the overhanging pieces
which should wrap around neatly to the other side of the board.
Repeat this on
the other side and then sandpaper off all the rough pieces.
More resin is
now applied to get a glassy surface.
Fibreglassing
is very easing - there are no complicated processes- but a talk with the
dealer will cer- tainly be advantageous.
Use a thick brand
of fibreglass cloth for the job, and don't spare the resin.
After the fibreglassing is finished the fin should be placed about one inch from the tail, secured firmly with fibreglass.
|
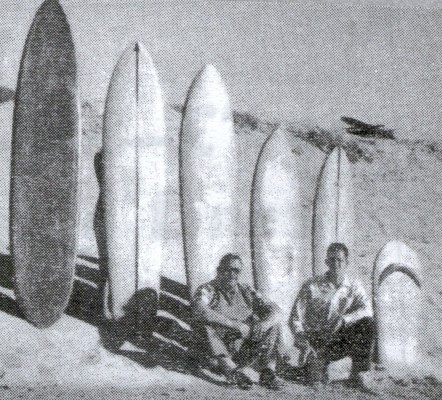
The boards
behind them are
|
 |
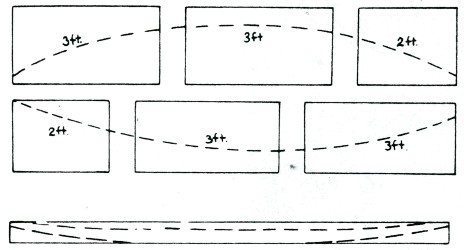 |
such a way that no join runs the full width of the board. |
 |
How to build a foam plastic surfboard. Australian Outdoors November, 1958, pages 11 to 12. This article contributed by Mick Kershler, with many thanks, October 2008. |
| home | catalogue | history | references | appendix |