surfresearch.com.au
 |
surfresearch.com.au
sibley : surf sleds and
boards, 1928
|
Hi Sibley : Surf Sleds
and Boards, 1928.
Sibley, Hi:
Surf Sleds and Boards
Popular Science Magazine
Volume 112 Number 6, June 1928, pages
79 and 96.
googlebooks.com
(Thanks to Howard Fink, April 2010)
Googlebooks-
Hi
Sibley: Surf Sled and Boards, 1928.
Introduction.
This 1928
article in Popular Science Magazine
was
identified by Howard Fink as presented on
googlebooks, April
2010.
Many thanks to Howard.
Reprinted in
Wakeling, Arthur (editor): Home Workshop Manual; how to make
furniture, ship and airplane models ... sporting equipment.
Popular Science Pub. Co., New York, 1930, pages 340-341.
Hathi Trust
https://hdl.handle.net/2027/wu.89097361323
Page
79
 |
Surf
Sleds
and
Boards
Simple
Ways to Build
Them
- One Type Is Only
a
Piece of Plywood, yet
It
Gives Thrilling Sport
By
HI SIBLEY
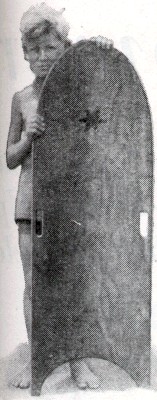
Fig.
1.
Most
successful
of the many varieties of surf
boards
used on
the breakers of southern California
is
this lightweigty
model made of plywood.
|
There
used to be a tradition that no one but a native Hawaiian could
ride a surf
board.
Young America,
expert in the sports of all nations, soon exploded that myth.
Now nearly
every
beach on the Atlantic and Pacific Coasts, as well as on the
Great Lakes,
has its devotees, some of whom have developed a fine skill.
Persistence
and
enthusiasm are required to master this exciting sport; it is
matter of
catching the right roller at right time- of climbing aboard
just the comber
is going over.
One can
learn
by practice better than by being told how to do it, but to
start with one
must have a suitable surf board or surf sled.
A sled
requires
a little more work to construct, but it will give the less
skilled or less
daring bather a sure-fire ride on the crest of the foam.
Both types
are
illustrated.
Surf boards
are
made in a large variety of styles to suit individual tastes,
but the one
which has proved the most successful on the breakers of
southern California
is the light plywood model shown in Fig. 1.
This
illustrates
a boy's size- about 4 1/2 ft. long.
A drawing at
the bottom of Fig. 3 shows how to make its adult prototype.
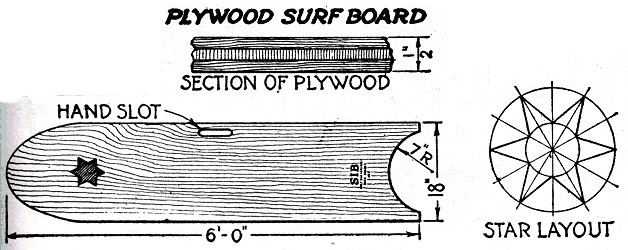
A plywood
board
is desirable because of its lightness and the fact that it
is not likely
to split or warp.
It may be
purchased
from any cabinetmaker and from many lumber yards.
A
three-layer
piece about 1/2 in. thick is satisfactory, although a
thicker piece of
five-ply wood will make a more substantial board.
Saw the
outlines
as shown with a good keyhole or turning saw.
A sharp saw
with
comparatively fine teeth is to be preferred, as there will
be less likelihood
of tearing the wood.
The hand
slot
is made by boring two 3/4-in. holes about 5 in. apart and
sawing out between
them. The slot is only for convenience in carrying the
board; it is not
used in the surf.
The rider
grips
the sides of the board where he can shift his grip or let it
go entirely
if disaster looms.
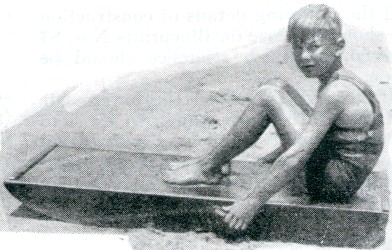 |
Fig.
2.
The
surf sled
can be used in any sea not too dangerous for ordinary
bathing.
The
rider holds
himself by the handgrips or lies flat on the
deck.
In
Fig. 3 is
shown a slightly improved design. |
It
is highly important to round off all sharp corners and edges
to prevent
cuts and bruises while in the turbulent surf.
You must also
give the edges several coats of spar varnish so there will be
no possibility
of the water's soaking in between the layers and loosening
them.
As the
plywood
usually has a beautiful grain, a natural finish with spar
varnish produces
the most
attractive
appearance.
First,
however,
paint in your star at the forward end.
Brilliant
vermilion,
or bright green with an out-line of gold, is effective.
On one board
the writer made a gold-leaf star with green border.
It is a good
idea to b put your initials and address at the lower end
of the board,
for anything as much in demand as a surf board has a
tendency to wander
from the home strand.
Because the
lower
end is cut to fit the body, the bather is able to walk out
facing the surf
and looking for an accommodating wave (Fig. 4).
When it
comes
he quickly swings the light board around and climbs aboard
for a swift
and merry trip.
Take great
care
that the nose of the board is always tilted up.
If it goes
down
and likes the sand, with a big breaker behind, painful
injury may result.
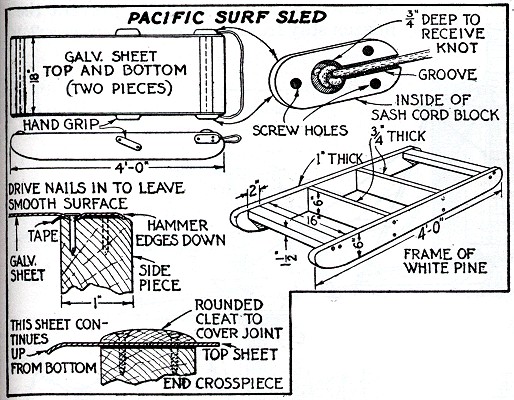 |
Fig.
3.
The
surf sled
is a frame of light white pine covered with galvanised
iron; the surf board
merely sawed from plywood.
(Images
adjusted) |
With a surf
sled
such as illustrated in Fig. 2 and the drawings in the upper
part of Fig.
3, the rankest amateur is guaranteed a successful,
hair-raising trip, provided
he once gets it out to the starting point.
Being
sufficiently
buoyant to support a heavy adult, the sled calls for little
skill except
in the matter of getting under way and has a great advantage
in that it
can be used successfUlly in much lighter surf than the surf
board.
It even can be
used as a float or raft in calm weather and will always be in
demand.
This type
of sled
is fairly light for a grown person to manage, but it is not
the thing for
a youngster to tackle, except in moderate seas, because of
the tremendous
force with which waves may strike it broadside.
Note that
all
edges and corners are rounded, so that if one has a spill
and is struck
by his mount, it will not leave any appreciable dents.
The vital
importance
of removing all protruding angles was learned after several
beginners had
become conspicuously bruised by screw eyes used in our first
model.
The proper
way
to maneuver the surf sled is to walk into the surf at right
angles, towing
the sled behind you by the sash cord provided for that
purpose.
It will
slide
over the oncoming breakers easily if the stern is lifted
slightly.
Use light
white
pine for the framework and fasten it with flat-head wood
screws, well countersunk.
The ...
(Continued
on page 98)
|
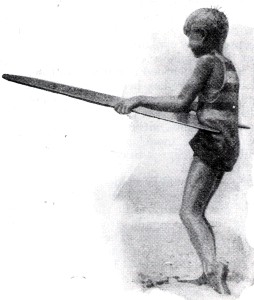
Fig.
4.
The
light plywood
surf board is easy to handle.
The
lower end
is cut so as to fit the body.
The
bather takes
this position when walking out into the surf. |
Page 98
(Continued
from page 79)
... ends
should
be rounded so that the galvanized sheet bottom can be carried
up around
them and fitted snugly at every point.
Have the top
and bottom galvanized sheets cut about 3/8 in. narrower than
the width
of the frame, so that there will be no possibility of their
protruding
and injuring the bather.
Likewise, the
corners of the sidepieces and handgrips must be rounded
smoothly.
Before
setting
the sheet metal, paint the edges of the side boards with
white lead and
lay a strip of muslin or electrician's tape the entire
length, taking care
that there are no folds or wrinkles.
Cover this
with
a coat of white lead.
Then fasten
the
galvanized iron with nails about 3/4 in. long, staggered
about 1 in. apart.
Drive them
in
well; then depress the edges of the metal into the wood
(Fig. 3).
The cleats
over
the places where the galvanized sheets join each other
should be drawn
down tightly with screws, but first nail the ends of the
sheets to the
crosspieces to make the joints water-tight.
Follow your
own
taste in painting and trimming; green with orange striping
is effective.
In any case,
be sure the first coat dries thoroughly before applying the
second.
Several
coats
of spar varllish will add to the life of the sled.

|
Sibley, Hi: Surf
Sleds and Boards
Popular Science Magazine
Volume 112 Number 6, June
1928, pages
79 and 96.
|
surfresearch.com.au
Geoff Cater (2010-2017) : Hi
Sibley
: Surf Sleds and Boards, 1928.
http://www.surfresearch.com.au/1926_Sibley_PopSc_June_p79.html